

All levels
|
39 min 29 sec
|
01:08
|
|
02:40
|
|
10:48
|
|
07:28
|
|
13:13
|
|
04:12
|
Thanksgiving Inspiration
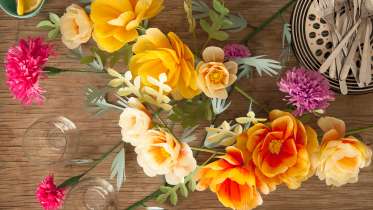
Paper Flowers: Make a Wild Rose and Thistle Centerpiece
Livia Cetti of The Green Vase
In this class, Livia shares her technique for making wild roses and thistles out of tissue paper. From dip-dye bleaching the paper to attaching the petals and leaves with floral tape, Livia covers every step of the paper-flower making process. She then shows you how to display the branches to make a gorgeous, organic tabletop centerpiece, perfect for weddings, parties, or any festive gathering.
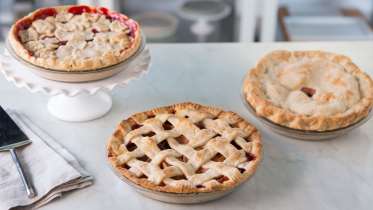
How to Make Pie Crust
Devlin Mannle
Homemade pies are beloved by all, but they can be particularly challenging to do well. Whether you're baking for a holiday, a barbecue, or just because, Devlin Mannle will show you how to make a killer pie you'll be proud to share on Instagram. Devlin shares his mother’s recipe for perfectly flaky pie crust, walking you through every step just like he’s in the kitchen beside you. You’ll learn tips and tricks for handling and rolling out the dough, as well as several traditional and decorative pie crust designs that will impress your guests, like lattice crust, cut outs and pretty crimped edges.
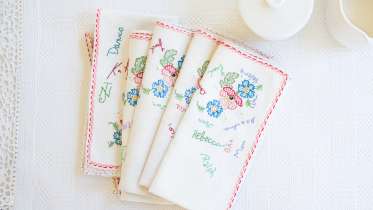
Embroidered Heirloom Napkins
Rebecca Ringquist
These embroidered napkins serve as a sentimental record of everyone who has gathered around your table for special meals and holidays. Rebecca shows you what kind of tools to use to gather signatures, and how to embroider those signatures or drawings onto napkins so they can be washed and used and cherished for years to come.
Now Playing
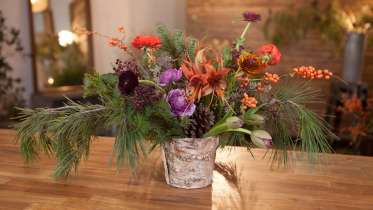
Flower Arranging
Studio Choo
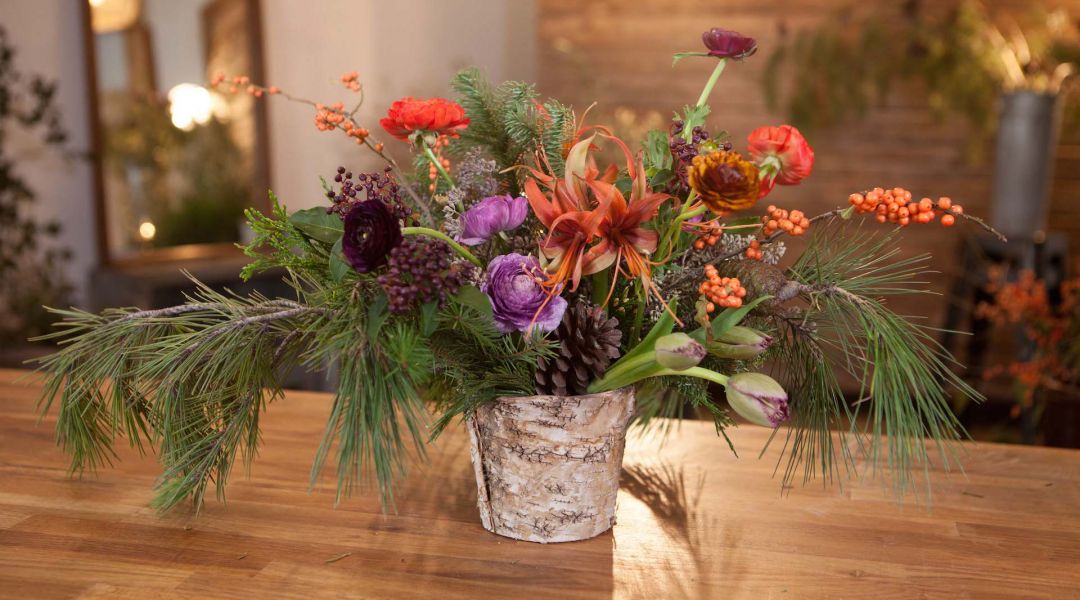
In this class, Alethea and Jill of Studio Choo teach the basics of making a gorgeous tabletop centerpiece, perfect for a holiday dinner. The arrangement begins with a lush framework of seasonal evergreen branches, and grows with flowers like amaryllis, ranunculus, and tulips that add pops of color. Berry branches are added last to create movement. As Jill explains her design process, the arrangement takes shape before your eyes, demonstrating how easy it can be to create an eye-catching centerpiece--even if this is your first time playing with flowers.

Felt Drink Markers
Amelia Strader
These unique wine markers are fun to make and require only the most basic of hand sewing skills. Dress up your next dinner party with these colorful markers, give them as party favors, or make a set a gift for any occasion. Be sure to download the PDF for the template.
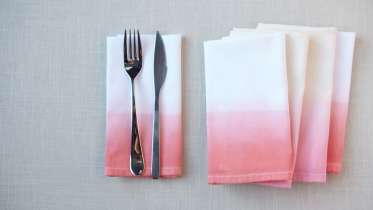
Dip-Dye Ombre Napkins
Kelly Wilkinson
Cloth napkins are the perfect size for perfecting the art of dip-dyeing. Kelly Wilkinson shows you tips and techniques to achieve an even, painterly gradation of color without splotches. After this workshop, you'll be dyeing with confidence and looking for more items to pretty up with an ombre effect. In addition to dyeing, you'll also learn how to cut simple stencils to add a pop of color and personal style at your next dinner party.
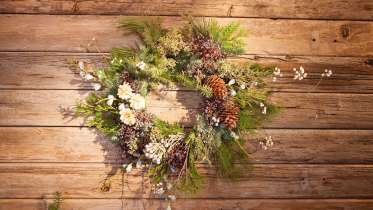
Winter Wreath
Studio Choo
This holiday season, make a festive wreath with Alethea and Jill of Studio Choo. Using a variety of evergreen branches, berries, pods and pinecones, Jill demonstrates how to snip branches down to manageable pieces and attach them securely to a wire wreath form. As she walks you through the process of building the wreath, Jill shares her signature ideas for combining different kinds of foliage to create a wild, organic look.
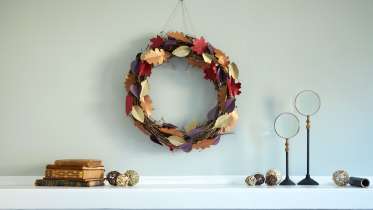
Cricut Crafts: DIY Fall Leaves Wreath
Lia Griffith
Make a festive wreath with shimmery paper leaves, perfect for fall decorating. Lia Griffith shows you how to score and cut a variety of leaf shapes, then add dimension by folding leaves for a more realistic look. Attach leaves to a withered and rustic grapevine wreath for a statement piece you can hang on the door or on a wall.
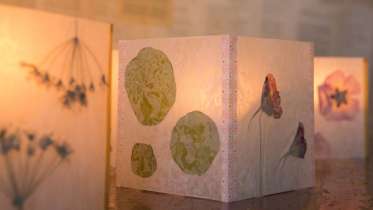
Make Luminaria Candle Shades
Kelly Wilkinson
Bring nature indoors with these simple, sweet lanterns that emit a lovely diffused light for any holiday table. These waxed paper lanterns come together quickly and easily and show off pressed flowers and leaves in a modern, casual way.
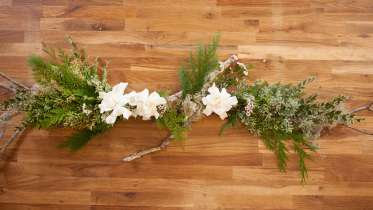
Winter Garland
Studio Choo
In this class, Alethea and Jill of Studio Choo show you how to make a festive holiday garland using seasonal greenery. The garland uses a branch as a base for a clean, modern take on holiday garlands. You'll see how to work with seasonal greenery including boxwood, cedar, wax flower, and seeded eucalyptus branches. A fragrant gardenia adds an unexpected touch of elegance. Throughout the class, Althea shares her philosophy for creating an organic design and teaches the basics of wire wrapping in order to make a sturdy, long-lasting garland, perfect for hanging on the wall or using as a tabletop centerpiece.

The Wilton Method: How to Make Woodgrain Fondant
Wilton Instructors
Woodgrain has a raw, woodsy look to it that complements any season and occasion. In this class, you will learn how to create custom fondant colors to achieve an organic woodgrain look using the Color Right Icing Color System. Stephanie shows you how to knead the fondant to create a marbled effect and roll it out to just the right thickness. Finally, you will cut out fondant shapes and add them to cookies and cupcakes using a thin layer of buttercream icing.

Painted Wooden Centerpiece
Courtney Cerruti
A good tablescape needs an eye-catching centerpiece to draw it together. Courtney demonstrates a variety of ways to paint and stylize wooden rounds that you can lay on your table for a pretty presentation. You will learn how to paint and stencil wooden rounds with spray paint, how to create color block designs, and how to use chalkboard paint and add a seasonal message. Mix and match your centerpieces, then complete your table decorations with coordinated votive candles.
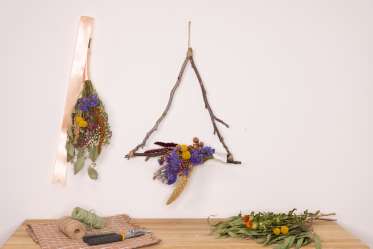
Botanical Boughs for All Seasons
Cobrina
Looking for a bit of seasonal foliage to greet you at your front door? In this class, Cobrina of Creativebug shows you how using fresh, dried, or faux leaves and flowers can create a simple bough for your door or anywhere in your home. She demonstrates two of her favorite ways to hang these lovely sprigs - a simple upside-down bouquet hung by a ribbon, as well as one that uses branches to make a triangle shape, creating a more modern feel. Whether you collect foliage from the outdoors or want to use a beautifully fading bouquet, these botanical boughs are easy to update and refresh throughout the seasons.

Sew a Pie Carrier
Liana Allday
Make easy work of transporting your freshly baked pie with this simply stitched pie carrier. Sewist-with-a-sweet-tooth Liana Allday shows how two pieces of cotton fabric plus handy cotton webbing straps quickly come together to make a classy bag to tote your torte. Whether the pie carrier is for transporting your own desserts or as a gift to your favorite baker, this project comes together in less than an hour – just enough time to whip up something delicious.

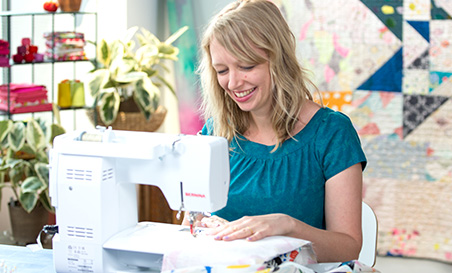
How to Sew Napkins
Liana Allday
In this class, Liana Allday shares three different ways to make and finish cloth napkins. Learn how to make playful fringed-edge napkins, faux rolled-hem farmhouse napkins, and classic mitered corner napkins. Whether you’re throwing an extravagant dinner party or making a batch to give as a gift, Liana shares how easy it is to select fabrics that will cater to your occasion. These napkins require minimal sewing, making them the perfect skill-building project for beginners.
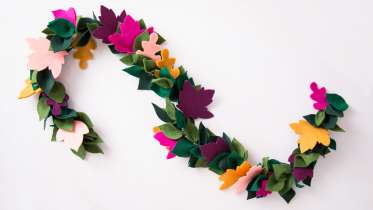
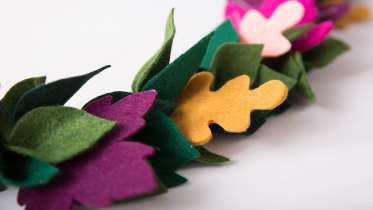
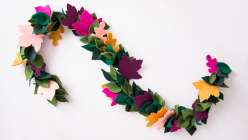
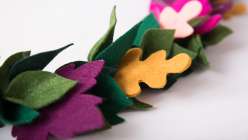
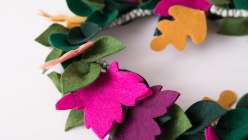
Cricut Crafts: Fall Leaf Garland
Amber of Damask Love
Bring your tabletop to life with this leafy felt garland, perfect for year-round celebrations. Amber Kemp-Gerstel from Damask Love shows you how to cut out several leaf shapes on the Cricut Maker and assemble them with floral wire for sturdy construction. In the version shown here, Amber uses mostly green leaves with fun pops of color throughout, but you can make your leaves any color you like to suit the season. Get the template free on the Cricut Design Space.

Taught by Amber of Damask Love
Bring your tabletop to life with this leafy felt garland, perfect for year-round celebrations. Amber Kemp-Gerstel from Damask Love shows you how to cut out several leaf shapes on the Cricut Maker and assemble them with floral wire for sturdy construction. In the version shown here, Amber uses mostly green leaves with fun pops of color throughout, but you can make your leaves any color you like to suit the season. Get the template free on the Cricut Design Space.
Learn how to:
What you’ll get:
Here’s what you’ll need:
Get the project design file on Cricut.com
- 2 sheets each of light and dark green felt 12" x 24"
- 4 sheet each felt in a mix of accent colors. Amber uses: Raspberry Pink, Eggplant Purple, Peach, Mustard Orange,
- 2 yards ½” cotton piping
- Cricut Maker
- Long Light Grip Cricut Mat
- Standard Light Grip Cricut Mat
- Sewing machine that can sew with twine or decorative thread. Amber uses the We R Memory Keepers Stitch Happy Sewing Machine
- Roll of floral wire
- Wire cutter
- Felt glue
- Sewing machine & thread
- Hot glue and hot glue gun
- Scissors
Downloads:
- Cut detailed felt leaves using the Cricut Maker
- Assemble a tabletop garland with floral wire
- Change mat size in the Design Space
- Duplicate number of images cut in Design Space
What you’ll get:
- Detailed instruction on how to make a felt leaf garland using a Cricut Maker
- 5 HD video lessons you can access online anytime, anywhere
- Detailed supply list
- Step-by-step instruction by expert instructor Amber of Damask Love
- The ability to leave comments, ask question and interact with other students
Member Gallery
Browse members' projects from this class and share your own work! Learn how to take great photos here.
Load More
Transcript
Class PDF
Cricut Crafts: Fall Leaf Garland Reviews
192 users recommended this class to a friend

Shernette Prince
Beautiful arrangement. She clearly explained the thought process behind each placement throughout.
More than 3 months ago
g...@carlsbadca.creativebug.com
Good explanation of how the greenery is used as an anchor for the other greenery and flowers. Also, liked how she explained how to group flowers within the arrangement by color family.
More than 3 months ago
M H
Not enough information regarding composition, colour, types of flowers or greenery may or may not go together. The instructors were very uncharismatic and low energy. Also, this class seems to be suitable only for those people who have access to a lot of materials (for those who own a flower shop), no indication of how much material one should buy for a small, mid-size or large vase. There is potential for waste if you buy too much or frustration if you buy too little. No information on how long arrangement will last, no info that I heard about how to make the arrangement last longer except for adding water, cleaning and trimming.
More than 3 months ago
1
Related Classes