

All levels
|
2 hours 28 min
|
01:38
|
|
00:37
|
|
02:58
|
|
20:32
|
|
07:00
|
|
01:54
|
|
04:48
|
|
00:34
|
|
20:40
|
|
17:33
|
|
03:50
|
|
00:31
|
|
06:22
|
|
13:56
|
|
04:43
|
|
00:58
|
|
00:30
|
|
04:26
|
|
13:57
|
|
03:34
|
|
07:32
|
|
10:17
|
Mother's Day Gifts
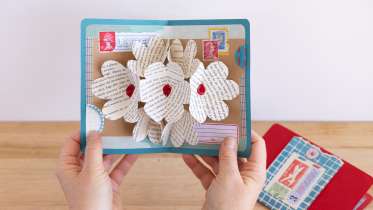
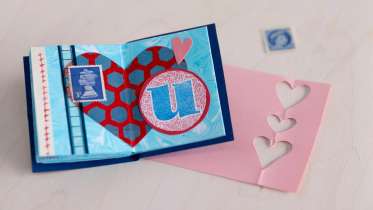
Make a Pop-Up Flower Greeting Card
Bel Mills of Scrap Paper Circus
Watch paper flowers bloom right before your very eyes! In this class, Bel Mills, the book artist behind Scrap Paper Circus, will show you how to create a blooming three-dimensional flower sculpture tucked inside a colorfully collaged handmade card. Stylistically combining vintage and modern and utilizing upcycled materials, this composed art card is a timeless gift of flowers you can send through the mail. Bel will also show you how to hand make an accompanying envelope. You can't go wrong—everyone loves a pop-up!
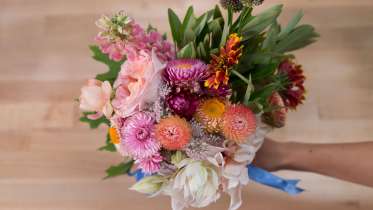
DIY Flower Bouquets
100LayerCake
In this colorful class, the wedding experts at 100 Layer Cake demonstrate how to make perfect bouquets with help from Emily of Shotgun Floral. Learn how to make a gorgeous composition using lots of different varietals, and the best strategy for working with color. Once you’ve combined your favorite flowers into a stunning bouquet, you’ll learn how to secure the arrangement with tape, ribbon and pins.
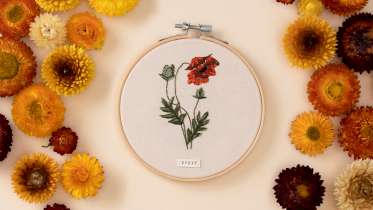
Thread Painting: Embroider Spring Blooms
Anna Hultin of OlanderCO Embroidery
Colorado artist Anna Hultin of OlanderCO is known for her gorgeously stitched landscapes and botanicals inspired by the land. In this class, Anna teaches how to embroider two of her favorite spring blooms: the Oriental Poppy and the Sweat Pea. After learning two simple stitches - the back stitch and satin stitch - you'll see why Anna calls her embroidery style "thread painting," approaching her stitches like paint strokes on a canvas and realistically blending colors. Anna guides you through her entire process, from transferring a pattern to fabric to attaching labels for a perfect finish. If you admire the minimalist beauty of botanical illustrations, you will fall in love with translating this style into thread.

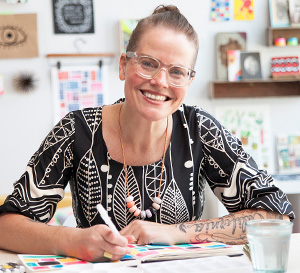
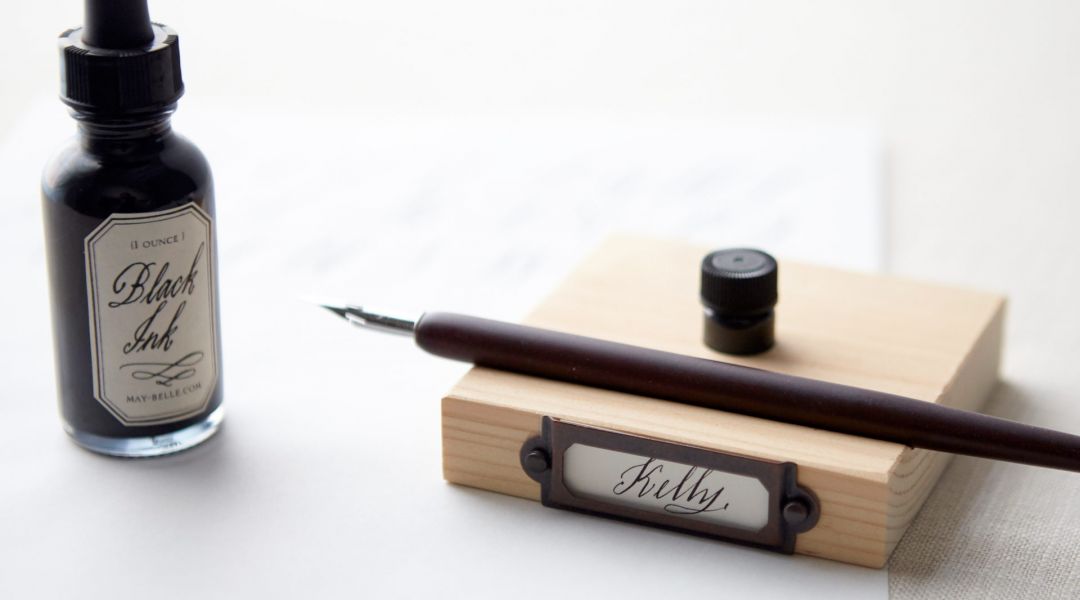
Modern Calligraphy: A 4-Part Series
Maybelle Imasa-Stukuls
Learn the art of calligraphy from a modern master–Maybelle Imasa-Stukuls. This four-part course is perfect for beginners, including ample warm up exercises that will help you understand how to hold the pen and control the flow of ink onto the page. From there, you’ll learn how to form upper and lowercase letters in a modern style, and how to join them to create beautiful words and phrases. By the end of this course, you will be ready to apply calligraphy to anything imaginable, from a simple address on an envelope to stunning wedding invitations. Learn and be inspired by Maybelle's distinctly modern approach to an ancient art form.
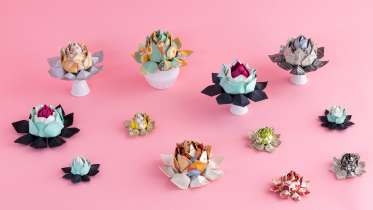
Fold a Paper Lotus Flower
Mia Semingson of Two Hands Paperie
From ancient Egypt to Buddhism and Hinduism, the lotus flower represents the cycle of life, rebirth, peace, and love. In this class, you'll learn how to make a beautiful folded paper version of the legendary lotus. It looks extremely intricate, but the folds are actually quite simple. Mia Semingson is an artist, book binder, and owner of Two Hands Paperie in Boulder, Colorado, and she is always looking for creative ways to use paper. With basic origami techniques, Mia will guide you through constructing a four-layered lotus blossom. You can use it as a gift wrap embellishment, ornament, or even include it as part of your own rituals and celebrations by writing messages inside the folds, like wishes for friends or thoughtful intentions.
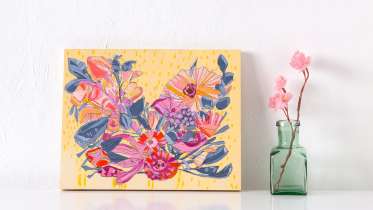
Painting Abstract Florals
Pam Garrison
Dive into color with artist Pam Garrison as she shows you her favorite techniques for painting abstract florals. Starting with a real bouquet, Pam will guide you through designing a flat-lay to set up your composition, doodling with pen to create dynamic lines, and completing your painting with Acryla Gouache. By bridging the gap between real and abstract, Pam gives you a simple and fun approach to painting beautiful blooms.
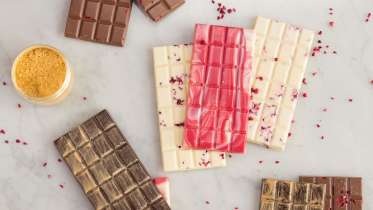
Mastering Chocolate at Home
Mark Tilling
Working with chocolate is an art unto itself, and there’s no better person to learn from than master chocolatier, Mark Tilling. The first step in any chocolate making project is learning how to temper chocolate. This process perfects the crystallization structure, ensuring that, when cooled, your chocolate will be glossy and have a great snap. The tempering process can make or break your chocolate creation, so it’s important to temper it correctly for successful results. In the first part of this class, Mark teaches how to melt chocolate in a microwave or double boiler and how to troubleshoot common mistakes along the way. Once you understand how to temper chocolate, making your own chocolate bars is a quick next step. Mark shows you how to use a bar mold and delicious mix-ins, like dried fruits and popping candies, to create custom bars featuring dark, milk, and white chocolates. In addition to showing how to combine flavors, Mark also demonstrates how to color and marble chocolate, and work with cocoa butter gold coloring to paint your darkest bars. Once you understand the fundamentals of working with chocolate, you’ll have a basis upon which to expand your skills.
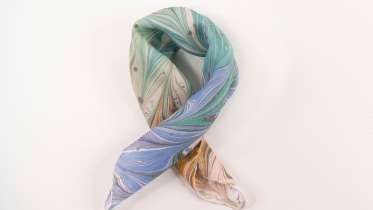
Marbling Finished Goods
Mercedez Rex
Have you ever wondered what you could marble beyond paper? Surface designer and marbling artist Mercedez Rex has, and she's put it to the test. Building on the foundation of her introductory class, Marbling Through Creativity, this lesson delves into printing on various finished goods. Mercedez demonstrates how to transfer marbled designs onto a silk scarf, a two-sided canvas bag, a cotton crop top, and a terracotta pot. You'll learn foundational marbling patterns, experiment with tools like a stylus and straw, and pick up tips for working solo. With natural materials like silk, wood, leather, canvas, and clay, the possibilities are endless!
Check out Mercedez' Marbling Through Creativity: An Introduction and Daily Practice for how to get set up.
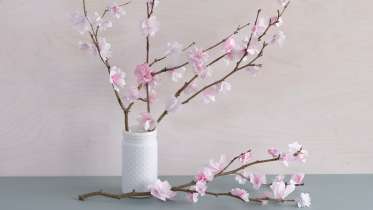
Make a Paper Cherry Blossom Branch
Mia Semingson of Two Hands Paperie
Cherry blossom season is fast and fleeting; the peak bloom period, when the blossoms are open, lasts only a few days. Capture that springtime wonder by making ever-blooming paper cherry blossoms with Mia Semingson. Mia is an artist, book binder, and owner of Two Hands Paperie in Boulder Colorado. In this class she teaches you how to use basic origami folds, simple cutting techniques, and a fun dip dye process to transform paper into beautiful flowers. How each one turns out is a mystery until you unfold them, and the surprise is part of the magic. You can use your cherry blossoms to adorn the tops of gifts and Mia also shows you how to attach them to a branch for a beautiful decor piece.
Love Note Zine Using Marbled Papers
Bel Mills of Scrap Paper Circus
This fun and flirty Love Note Zine begins with a single sheet of beautifully marbled paper made using shaving cream and food coloring. Bel Mills, the artist behind Scrap Paper Circus, walks you through the process and shows you how a few simple folds turns a single sheet of paper into a pretty booklet ready to fill with a heartfelt message. Open to book artists of all skill levels, this project is a wonderful way share creativity with loved ones.

Embroidered Botanical Pattern Weights
Rebecca Ringquist
Pattern weights are handy little tools that keep pattern pieces in place to make sure you're cutting your fabric as accurately as possible. Artist Rebecca Ringquist created her own Dropcloth sampler after sewing more and wanting a lovely version of this essential tool. This embroidery sampler includes four botanical patterned panels to be embroidered by hand and then when they've been completed, Rebecca demonstrates how to sew them and fill them up. Faster to adjust than pins, weights won't bunch the fabric or leave pin holes in your textiles and are just so pretty to boot.

The Wilton Method of Cake Decorating: Cupcakes with Buttercream Swirls
Wilton Instructors
Part 2 is all about cupcakes and piped buttercream. First, you’ll learn all of the piping basics, like how to change the consistency and color of buttercream, how to fill a decorating bag, and proper hand positioning. From there, you’ll learn how to make pretty rosettes, classic swirls and other fun ideas for adding stripes. Once you’ve taken this class, you’ll be a piping bag pro, ready to create a colorful dessert table with lots of gorgeous texture.
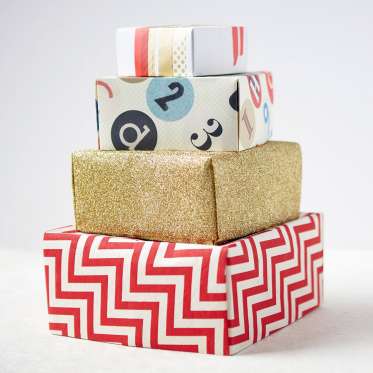
How to Fold a Paper Box
Liana Allday
Create custom-sized boxes using decorative paper with Liana from Creativebug. These pretty paper boxes have their roots in origami, coming together with a series of simple folds. You'll learn how to make box tops with matching bottoms, which make cute gift containers for any occasion.
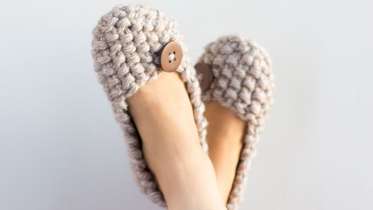
Knitted Seed Stitch Slippers
Wendy Bernard
Whip up a pair of cozy slippers in no time at all using bulky yarn and large knitting needles. Worked in a nubby Seed Stitch pattern, these slippers come together quickly and are topped off with a cute button accent. This satisfying project is great for beginning knitters who want to practice shaping and stitch patterns, as well as seasoned knitters who simply want a break from a bigger project.
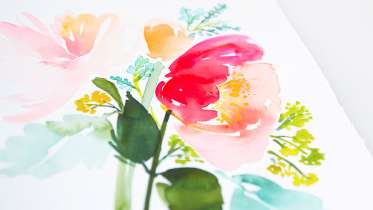
Intermediate Watercolor: Painting Florals
Yao Cheng
Learn how to paint gorgeous, gestural florals that reflect the vitality and energy of a freshly picked flower. This class is not about capturing the detail in every petal and leaf – what’s more important is focusing on the composition and the movement of the arrangement. Once you’ve learned how to create leaves and single stem flowers, you’ll learn how to combine these elements to paint a stunning bouquet.

Sew a Linen Bucket Bag
Elke Bergeron
Create your own linen and leather bag with the expert guidance of Elke Bergeron. Elke shows you how to sew a classic bucket bag, plus she shows you how to make a beautiful leather shoulder strap and a coordinating leather tassel. This class provides a foundation in basic sewing and leather-working skills, and results in a gorgeous handbag, perfect for year-round use.
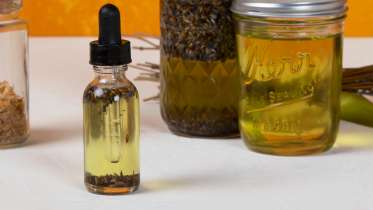
Make an Herbal Infused Body Oil
Arina from BellaCreme
Arina Soler believes in creating products with care, consciousness, and consideration. As owner of BellaCreme, an all natural skincare company operating out of the Hudson Valley, she handmakes herbal infusions, salves, and soaps using natural colorants, scents, and unrefined, responsible ingredients. Botanical oil infusions allow you the ability appreciate and enjoy the beneficial properties of nature, are simple to prepare and even easier to use. This class will teach you how to begin making your own natural skin products that are both beautiful and resourceful.
Want more ideas of how to use this oil? Watch Arina's Make Hand and Body Salve class!
Want more ideas of how to use this oil? Watch Arina's Make Hand and Body Salve class!
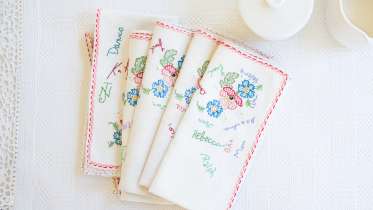
Embroidered Heirloom Napkins
Rebecca Ringquist
These embroidered napkins serve as a sentimental record of everyone who has gathered around your table for special meals and holidays. Rebecca shows you what kind of tools to use to gather signatures, and how to embroider those signatures or drawings onto napkins so they can be washed and used and cherished for years to come.
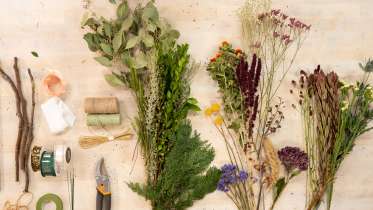
Botanical Boughs for All Seasons
Cobrina
Looking for a bit of seasonal foliage to greet you at your front door? In this class, Cobrina of Creativebug shows you how using fresh, dried, or faux leaves and flowers can create a simple bough for your door or anywhere in your home. She demonstrates two of her favorite ways to hang these lovely sprigs - a simple upside-down bouquet hung by a ribbon, as well as one that uses branches to make a triangle shape, creating a more modern feel. Whether you collect foliage from the outdoors or want to use a beautifully fading bouquet, these botanical boughs are easy to update and refresh throughout the seasons.
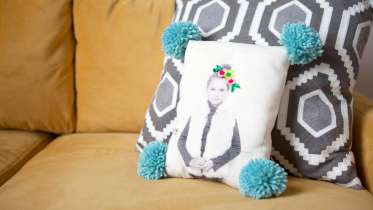
Sew Embellished Photo Pillows
Annabel Wrigley
Learn how to print your favorite image onto fabric and transform it into a personalized pillow. Annabel shares lots of ideas for embellishing your pillow with embroidery and pompoms to add color, texture, and fun. These customizable pillows make wonderful keepsake gifts, perfect for celebrating anything from a special moment to a favorite person or pet.
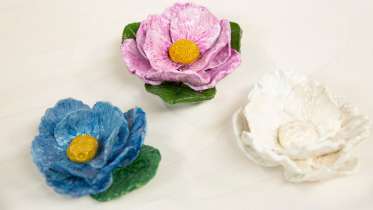
Make a Peony with Air-Dry Clay
Cindy Willingham
Cindy Willingham is a painter, potter, and everything in between. Her work is often inspired by nature, and when she used to spend six months of winter living in Maine, she would always dream of flowers. Join Cindy as she teaches you how to create beautifully textured peonies with air-dry clay. Air-dry clay shares many similarities with kiln-fired clay, and all the hand-building you'll learn in this class applies to both. Cindy demonstrates how to condition air-dry clay, form a slab - which is the foundation of many clay projects - and sculpt a flower using unexpected but accessible household tools. You'll then learn how to paint the clay with a dreamy watercolor-inspired technique and seal it to protect your work. No kiln is needed with air-dry clay, just patience and time for your clay flower garden to grow.

Sew a Heating Pad
Sanae Ishida
Author, illustrator, and sewist Sanae Ishida is a maker of many things. In this class, she guides you through sewing a cozy heating pad with rice filling. This project is based on the heating pad from Sanae's book Sewing Happiness, and she designed this larger version to be able to wrap around your neck, shoulders, abdomen, and wherever you need some soothing warmth. This is a quick and easy project - no pattern necessary. Learn how to measure and cut your fabric, sew straight lines with a sewing machine, create channels in the heating pad to ensure the filling remains evenly distributed, and finish the project with hand-sewing. Bear in mind that due to the amount of rice filling, this neck warmer is fairly weighty. It’s a comforting weightiness, though, and with a few drops of soothing essential oils and a minute or two in the microwave, you’ll create your own spa experience. Finished measurements are approximately 36" x 6".
Sew a Butterfly Wrap
Ashley Nickels
Sew a drapey, gauzy, layering piece in next to no time to quickly top any outfit. Sewer Ashley Nickels demonstrates how to use a comfortably-fitting oversized t-shirt to make your own template, cut your fabric, then stitch together with underarm seams. A rolled-hem foot makes finishing the edges a breeze with options provided for a double-fold hem option.
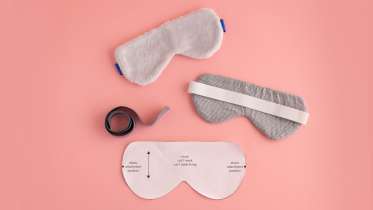
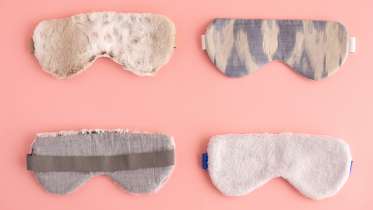
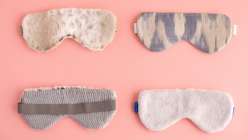
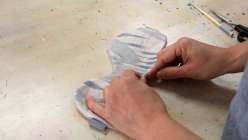
Sew a Sleep Mask
Sanae Ishida
Slumber is serious business when it comes to health and maximizing your beauty sleep. Artist, illustrator, and maker Sanae Ishida shows you how to whip up an easy and luxurious sleep mask. Learn how to use a template to cut your fabric pieces, work with fusible fleece, and sew the curves of your sleep mask with a sewing machine. A simple strip of foldover elastic provides a comfortable fit around your head. The best part of knowing how to DIY a sleep mask is how easy it is to tweak the shape to your liking, and you'll have so much fun making more in a variety of colors and fabrics, whether they're for special gifts or all for you.

Taught by Sanae Ishida
Start Free Trial or
Buy For $9.95
Slumber is serious business when it comes to health and maximizing your beauty sleep. Artist, illustrator, and maker Sanae Ishida shows you how to whip up an easy and luxurious sleep mask. Learn how to use a template to cut your fabric pieces, work with fusible fleece, and sew the curves of your sleep mask with a sewing machine. A simple strip of foldover elastic provides a comfortable fit around your head. The best part of knowing how to DIY a sleep mask is how easy it is to tweak the shape to your liking, and you'll have so much fun making more in a variety of colors and fabrics, whether they're for special gifts or all for you.
Learn how to:
Here’s what you’ll need:
- 11 ” x 5” fabric for mask (sherpa, velvet, cotton, cotton/linen blends, silk, rayon)
- 11 ” x 5” fabric for mask lining (velvet, cotton lawn, silk, rayon)
- 11 ” x 5” fusible fleece
- 12” of 1" foldover elastic
- Coordinating thread
- Marking tool
- Fabric shears
- Snips
- Sewing machine
- Hand sewing needle
- Iron and ironing surface
Downloads:
- Sew a sleep mask
- Machine sew around a curve
- Work with fusible fleece
- Sew in an elastic band
- Sew the slip stitch by hand

Member Gallery
Browse members' projects from this class and share your own work! Learn how to take great photos here.
Load More
Transcript
Class PDF
Sew a Sleep Mask Reviews
1511 users recommended this class to a friend

Joo-Yun Kim
Enjoyed learning! Great class.
More than 3 months ago
1
Jennifer K
wonderful!
More than 3 months ago
1
Amit V
It was wonderful! I loved it. Will surely be trying it out
More than 3 months ago
1
Related Classes